Accessories help to look unique, exclusive and fashionable.
They help a woman of any age to elegantly complement her appearance.
It is especially nice to wear handmade jewelry.
How much labor and imagination has been invested in them!
And how nice it is to give such gifts to loved ones. Such actions make the moment memorable.
The master class is dedicated to the most pleasant - hair decoration. As soon as a woman adorns herself, whatever delights she comes up with. Be that as it may, the decoration must be done with taste and like by the owner.
DIY hair clips. Elegant simple hairpin with a bow
An elegant little hairpin with your own hands will perfectly suit a small pink dress for the holiday. She will look especially cute in the hair of a little girl. This beautiful little highlight will only adorn the overall exterior style.

To start the creative process you will need: a black simple flat metal hairpin from the store, a pink ribbon from satin 5 cm wide, a narrow pink ribbon with a pattern on the fabric, glue, a needle, a thread matching the ribbons, a candle and a match.

Scissors are taken. A 6 cm long strip is cut from a wide pink ribbon. In this case, four hairpins are made at once, therefore there are four ribbons in the figure.

Similar actions are performed with a narrow pink ribbon. A 1.5 cm long strip is cut out. All edges of the resulting strips are neatly cauterized over the fire. If you slowly bring the edge of the tape to the fire, it will begin to melt a little and there will be no black opal.
After that, the strip is folded by two and stitched, as shown in the figure. At the end of the seam, the thread is pulled together. And the ribbon takes the form of a bow.
In a bottleneck, the resulting bow turns into a second ribbon - thin. From the inside, a thin ribbon is sewn to the bow.
And finally, the resulting elegant bow is glued to a metal barrette. After the glue dries, the new thing can be safely pinned to the hair.

♥♥♥

DIY hair clips. Cotton lace barrette
It is proposed to make a gentle white hairpin with a bow in the English style with your own hands. Such a hairpin will be a worthy decoration not only of the evening toilet, but also of a business suit.

In the process of work, the following materials will be required: cotton lace or cotton sewing 40 cm long and 7 to 10 cm wide, cream-colored satin ribbon 40 cm long, golden button, artificial pearls with a diameter of 0.2 cm in the amount of 14 pieces, hairpin - the base on which the bow, glue, scissors, needle, thread in tone, 2 pieces wire are glued. 2 cm long
Cotton lace is taken and cut into two strips. Both strips are stitched as shown in fig. 1 and 2.

After that, the resulting part is turned on the front side with a seam inward and straightened (Fig. 3). Both straight edges of the part are sewn together. Lace is gathered in the center (Fig. 4) and a bow is shaped (Fig. 5). For temporary holding in the form of a bow, you can use any improvised wire. Further, the satin ribbon is also given the shape of a bow (Fig. 6). It is superimposed on top of the lace and pulled together in the center by wire (Fig. 7). The center of the satin ribbon is wrapped once to cover the wire and is sewn together on the wrong side to make the fastening reliable (Fig. 8). Then, a button with an ornament is sewn into the center of the bow. Lace embroidered with pearls.
Finally, an English-style bow is glued to a metal barrette. After the glue dries, the resulting hair clip can hold the hair together.
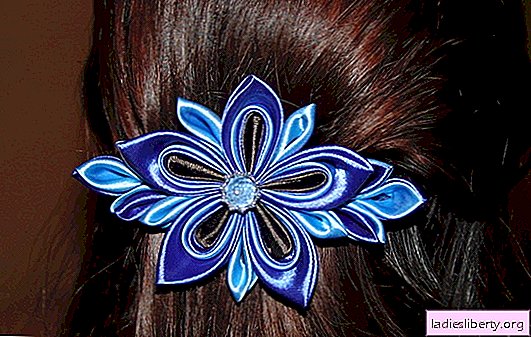
DIY hair clips. Sophisticated kanzashi hairpin
Kanzashi is a traditional hair ornament in China and Japan. They come in completely different shapes and volumes: from miniature to hat sizes, from several flower shapes to large bouquets hanging from the head. The art of decorating hair in a similar style originated in Japan about 400 years ago. In culture, it was forbidden to be decorated with necklaces or wrist accessories, because the only logical solution for Japanese women was head decoration. Everything was decorated: combs, hair sticks, hairpins. This decoration technique became so deeply rooted in the tradition that the nature of jewelry began to be strictly regulated: the appearance of women differed in married, unmarried, having children and the number of children widowed, wealthy, or from other lower strata of society.

Nowadays, this protocol is not respected in everyday or holiday wear. However, women in Japan and China continue to decorate their hair in a traditional style. Recently, the kanzashi technique has appeared in Russia. The technique of making jewelry is not complicated, but it requires great care and skill.

To start the creative process you will need: a metal automatic hair clip, satin ribbons of dark green color and pink 5 cm wide, a large strassik, scissors, a ruler, a thread of two colors to match, a needle, a candle, matches, tweezers, fabric glue and a rectangular plastic mold. The entire future design will be mounted on a plastic mold, and it will be mounted on a metal hairpin.

Build Order:
• scissors are taken and a ribbon of both colors is cut into squares - 6/6 cm (Fig. 1). Sprinkled slices must immediately be fused with a candle flame;
• two squares of pink and dark green colors are folded into a triangle and placed on top of each other (Fig. 2). The right sharp corners of both triangles are fused by the fire;
• the folding of the triangle into a tube begins (from the side where the corners melted) (Fig. 3);
• not even curled up to the middle, the triangle bends in half. The rolled-up tube is outside (Fig. 4);
• the part is folded in two and the tube is inside (Fig. 5);
• A sharp looking corner is carefully cut with scissors and melts. All cuts should stick to each other from the flame of a candle (Fig. 6, 7);
• roll up and glue six future petals (Fig. 8);
• all petals are sewn to each other with threads in a beautiful flower shape (Fig. 9);
• now it is possible to make a plastic platform (Fig. 10);
• plastic is coated on all sides with glue (Fig. 11) and sewn from the wrong side;
• further, the resulting plastic base must be securely fixed to a metal hairpin (Fig. 12);

• for a more magnificent design, additional petals will be required: 12 squares of pink color and 8 of dark green (Fig. 13);
• the technique is fully consistent with the one described above (Fig. 14, 15) with only one difference: only pink squares in the amount of 6 pieces are used;
• pink petals are glued in between the petals of the main flower (16, 17);
• now you can make 6 petals of two colors and glue first a pair on the sides of the flower (Fig. 18), and then glue one more on both sides from the edge (Fig. 19);
• Finally, a large and single strassik is glued to the center of the flower.
Congratulations, after the glue dries (about a day), you can proudly stab your hair with such a wonderful handmade hair clip made of ribbons.